Graph violence
In my previous dev log I talked about the graph structure we use to model enemy behaviours. This week I will look at a single enemy, and show how we go from a design to a usable model.
Introduction
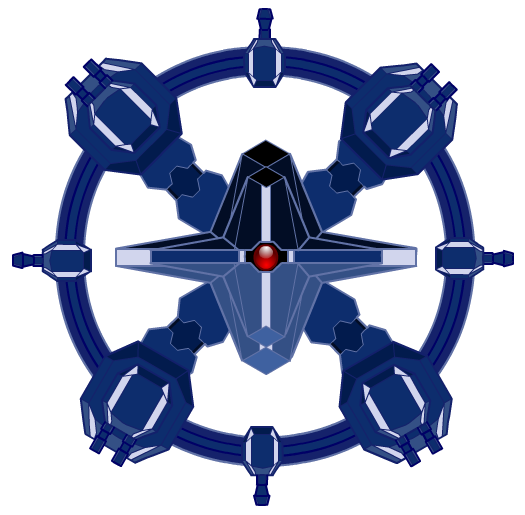
The enemy in question is a new boss for the upcoming free content update. The boss goes by the name Project Fatboss and was designed to add a boss that thematically fits with the very popular (*cough*) blue pew drones.
The boss was implemented with the use of a design documents. Design documents describe the behaviour and mechanics of an enemy in plain text and images. For the purpose of this devlog I have made the design document for Project Fatboss available for download below:
Below I will discuss how I went from this design document to the final design. There are some small changes in the final boss design, which I will not discuss here. Also note that I implemented this boss mainly on stream. Sadly Twitch does not store videos long enough, so they are no longer watchable, but if you are interested how we tackle these problems, feel free to tune in to our livestreams - https://twitch.tv/amulware (selected Wednesdays) and https://twitch.tv/tomrijnbeek (most Saturdays, including tomorrow!) - where we will be open to ask any questions you might have and often take feedback from the chat.
The guns
When reading through the design, there is one thing that immediately comes to my attention: the guns. The behaviour of the guns stands is entirely independent from the rest of the behaviour. The design also contains the suggestion to make the large guns destroyable separately. These mechanics almost make the guns separate enemies.
The advantage of separating the gun behaviour is that I can completely ignore them in the main behaviour controller of the boss, making it simpler and easier to maintain. That is why I made the decision to go through with this and create separate enemies for the guns.
The behaviour of the guns can easily be implemented in a single class, so the behaviour graph of the guns consist of a single node controlling the direction and shooting of the gun. The gun is attached to a bone in the animation skeleton of the boss, so the position of the gun can be easily fixed.
Furthermore, the two different types of gun share the exact same behaviour. The only difference is the parameters that should be used for rotating the gun. Our behaviour system allows us to define additional parameters for the behaviour of an enemy, which means we use the same graph, but the nodes can access the parameter and have slightly different behaviour that way.
Movement
The next step in the process was to actually make the boss do something itself. For now we will forget about what exactly we want the boss to do and focus on the movement on the boss.
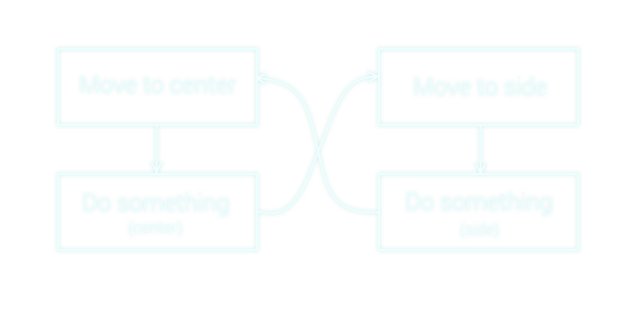
The boss has two different states: it can be in the middle or it can be on either of the two sides. There is not really any difference between the boss being on the left or on the right, as we can just mirror the behaviour if necessary.
To transition between these states, the boss needs to move from one place to another. During this transition no other behaviour is happening, so the movement should also be a state in the behaviour of the boss.
If we combine all this, we get a relatively simple behaviour graph:
DoSomething()
Since we now have a general graph structure to work with, we can start filling in the blanks. In this case it's the "do something" parts. We don't want to boss to move all the time, so we usually want to do more than one thing before moving again. That means that we have to replace the "do something" nodes by more than one node. We also don't want the boss to perform the same sequence of actions all the time, so we can't just make a sequentual graph. Instead we will make something like this:
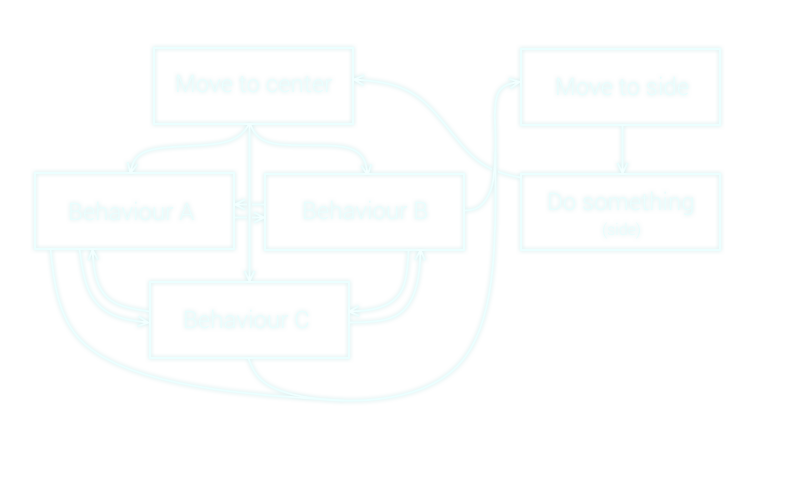
Remark: only the center "do something" has been filled in to keep the image readable; the side one can be handled in completely the same way.
So... this looks quite a bit more complicated than the things we have seen so far. Let's take a look at what we have:
We still recognise the basic structure from before: the move nodes and the intermediate behaviours. After each move node, the enemy moves to do something else. After doing something else, the enemy moves again. Instead of a single node that represents the doing something we now have multiple nodes that represent different behaviours. All these behaviours are fully connected, so the boss can switch between these behaviours randomly. At a certain condition, the behaviour transitions into the move node, and the same pattern repeats.
If you remember from last time, outgoing arcs for a node are built from a condition and a new node. That is however not entirely sufficient for what we want to do here. We have a shared condition, but we want to select a different node randomly. If we were to just add multiple arcs with the same condition, we would always choose the same one, so we need to slightly change how it works.
This exact problem actually caused me to make a small change in the implementation. Instead of giving the arc a condition and a node, the arcs gives a condition and a function that returns a node. In other words, it only decides on the outgoing node at the point the arc is being traversed. In our case, the arc is given a list of nodes to choose one from randomly.
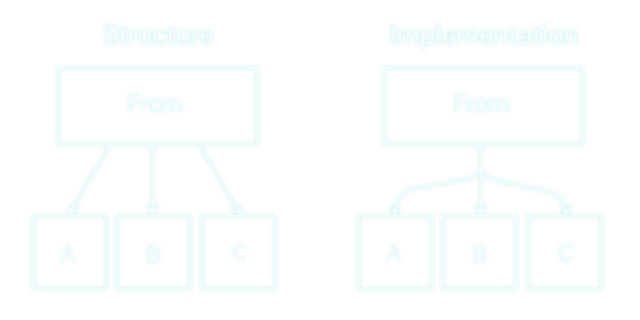
The implementation therefore does not look exactly like the graph shown above, but the structure is still clearly recognisable. Below is an image that shows the difference between the graph structure and the implementation visually.
Conclusion
There is a lot more to actually make the boss work, and many design elements from the document we haven't talked about. However, I hope that I have made clear how we approach going from a design to a model of the enemy, which we can then implement fairly easily.
The concepts I discussed were actually first introduced for this boss, but have already been used elsewhere (follow us on Twitter - @amulware and @tomrijnbeek if you want to know more). As always, if you have any questions, please leave a comment and I will get back to you.